 |
Home page |
|
Documentation top level |
St-mem pool exhausted, binpatch '_st_pool_size' mean?dma-ready: code = 2 mean?NetBSD bootblock not on primary AHDI partition mean?Does not support linked commands mean?If you have any questions on NetBSD/atari that are not answered here, check the material referenced in the answer to the question 'where can I get more information'. If you still find no answer, turn to the port-atari mailing list.
The Atari release stepped in in March 1995. It is available for Atari TT, Falcon and Hades computers. The first official release was 1.1; the current release is 1.5.2.
A current list of ftp mirrors is at: http://www.NetBSD.org/mirrors/#ftp.
help or subscribe port-atari.
One may also subscribe to the mailing list through the NetBSD web site on
the NetBSD Mailing Lists page.
The NetBSD Project has a web site at URL http://www.NetBSD.org/. There are several mirror sites. Archives of the NetBSD mailing lists are available.
St-mem pool exhausted, binpatch '_st_pool_size' mean?
(top)
The "St-mem pool" is allocated at boot-time. It is located in the lower 16Mb of memory. It is used by drivers for Atari peripherals that were designed for the old 1040 ST that had an 24-bit address bus.
As it is currently impossible to specify where to allocate memory at run-time, there is no other way than allocate this memory at boot-time, before memory management is setup.
The St-mem pool is currently used by the video, floppy and the Falcon
SCSI driver. The default (BOOT) kernel supplied has a rather small St-mem
pool. This is done to enable it to boot in systems having only 4Mb of ram.
In fact it has a pool just big enough for 2 virtual consoles in ST-mode.
You can extend the size of the pool by binpatch-ing the kernel.
In the distribution directory .../utils.NetBSD,
you can find a binpatch binary and binpatch(8) manual page.
For setting the St-mem pool size, issue the following command from the shell prompt:
binpatch -s _st_pool_size -o 8192 -r <new_size> <path to kernel>
The value of new_size should be given in bytes and depends on the
following:
    video-resolution:
         ST-mode:    : 32Kb + 8Kb slack
         TT-mode     : 154Kb + 8Kb slack
         Falcon modes: size = (width * height * depth)/8 + 8Kb slack
    Falcon SCSI bounce buffers:
         I think 16Kb per SCSI target will do.
    Floppy:
         Maximum 1 track == 18Kb
Note that each virtual console needs a video buffer. So you should multiply
the value needed by the video by the number of virtual consoles defined.
dma-ready: code = 2 mean?
(top)
The discussion of whether or not SCSI parity checking should work on all devices on the Atari has not yet ended. There were rumours of hardware problems but until now, I've not yet seen a sensible reason why it shouldn't work. In practice however, some devices will give a lot of parity errors. Note that the discussion is about the parity checking on the host adapter (the Atari), not about parity checking on the SCSI-targets. The Atari generates the parity bit correctly (Although I remember Christoph Simon having a different experience). So it should be possible to enable parity checking on the SCSI-targets.
The NetBSD/atari kernel has a "bitfield" describing on what targets parity checking should be disabled. You can modify it with the binpatch program. The exact command line is:
binpatch -b -s _ncr5380_no_parchk -o 8192 -r <new_value> <path to kernel>
Target 0 is the low-order bit and target 7 the most significant bit of the
mask. So if you want to disable parity checking on targets 0 and 3, substitute
0x09 for <new_value>.
In my personal opinion, you should try to enable parity checking on all devices that it works for. The parity bit was not invented for fun! Also, you should enable the parity check on all connected targets.
NetBSD bootblock not on primary AHDI partition mean?
(top)
As you might know; every hard disk has a "root sector" that contains information about the size of the hard disk and the partitions on the hard disk. The root sector can only contain the necessary data for four partitions. Nobody thought that this limitation would cause any problems. After all, 640 KByte should be enough. As hard disks grew, it was necessary to define more than four partitions. In order to be more or less compatible with the old format, a new type of partition entry was defined: XGM partitions.
An XGM partition is a "look over there" sign: Another root sector can be found at the start of the XGM partition. This root sector contains the remaining real partitions. And this is the big mystery: Partitions defined in the root sector of the hard disk are called "primary partitions", partitions defined in the root sector of an XGM partition are called "extended partitions".
The bootblock will only work if the first NBD partition is a primary partition. This is not a limitation of NetBSD but a limitation of TOS/AHDI: You can only boot from primary partitions.
If you are creating your partitions with HDX, you'll have to be very careful to fulfill this rule. HDX has some very strange ideas when it comes to extended partitions. Fortunately, you can edit this stuff: The "Edit partition scheme of the unit" dialog box has a button label "expert". This button is inactive unless you have defined more than four partitions. Click on it after you have defined the sizes of the partitions.
A new dialog box appears on the screen. The left side contains two blocks of partitions: The upper block always contains the first four partitions, the lower block contains the last three partitions. If you have defined less than 7 partitions, some fields of the lower block will contain the string "unused". Some of the partitions will be displayed in reverse video: These are the extended partitions.
The right side contains six possible ranges for the extended partitions. It is not possible to define your own range, you will have to use one of the schemes offered by HDX. To quote from Ghostbusters: "Choose and die". The default scheme used by HDX is the first scheme: Extended partitions start with the second partition and end with the second to last partition. If you have defined 7 partitions, partitions #2 to #5 will be extended partitions, while partitions #1, #6 and #7 will be primary partitions.
You can move the extended partition range by clicking on one of the buttons on the right side of the dialog box. Try to find one where your first NetBSD partition is a primary partition. Golden rules:
Does not support linked commands mean?
(top)
To allow mixing older and newer devices, the atari SCSI-driver can be told explicitly to _never_ use linked commands on a target. This is done with the compile-time option 'TRY_SCSI_LINKED_COMMANDS'. This is a bit mask. A zero bit means: 'never use linked commands on this target'. A one bit means: 'try a linked command when appropriate, if the target gives an error on it, never try it again'. Another possibility is not to define this option at all, this will tell the SCSI-driver not to use linked commands at all.
Oh, bits are numbered from right to left. Excluding target 0 gives a mask of 0xfe. Normally, target 7 (the host adapter == interface) is also excluded, giving: 0x7e.
(A side note for Hades owners: Although the Hades BIOS does not support the BootPreference-bit (this was acknowledged by Christoph Aschwanden), the NetBSD boot loader will take it into account.)
When Atari was working on a System V port, it was decided to use the first byte for boot preference. While Waldi Ravens was working on a bootstrap loader for NetBSD/atari, he wanted to remain compatible with TOS and ASV. So he asked Eric Smith if it would be possible to reserve boot preference bit 0x20 for NetBSD. They agreed on the following scheme:
  0x80 - TOS
  0x40 - ASV
  0x20 - NetBSD
  0x10 - Linux
While in the NetBSD install program, you are given an opportunity to install bootblock code on your root disk. This requires a valid disklabel, though. (Also, see question 'Can I create a disklabel on my disk?') You can also install the bootloader and change the boot preference from a running NetBSD system. Read the boot_atari(8), bootpref(8) and the installboot(8) manual pages.
The atari console driver is built of the following components:
view
view is an abstraction of the video hardware.
grf
grf.
Each grf-driver is layered above a single view.
ite
ite-driver is layered above a single grf.
There is a 1-1 connection between the layers. ite2 talks to
grfxx2
that talks to view2.
(On the TT and Falcon, xx is cc, on the Hades, it's
et.)
For autoconfigure purposes, the grf-devices are grouped as a bus,
the grfbus0.
If you want to have 3 virtual consoles, your config file looks like:
  pseudo-device      # View (graphics mapping)
  grfxx1 at grfbus0  # second graphics driver
  grfxx2 at grfbus0  # third graphics driver
  ite1 at grfxx1     # second tty
  ite2 at grfxx2     # third
The devices
ite0/grfxx0 are always defined. To be exact, they
are defined in the file std.atari which is included in all
config files. The minimum number of virtual consoles is 1.
  /dev/fd0a -  360Kb
  /dev/fd0b -  720Kb
  /dev/fd0c - 1.44Mb
  partition a: A root-filesystem (if any)
  partition b: Swap space (if any)
  partition c: Whole disk (always :-) )
  partition d: First user/other partition
            |
            |
  partition p: Last user/other partition
The number of partitions that NetBSD can handle is currently 16 per disk.
(That may be changed to 32 later.) When you mount a GEMDOS file system,
don't forget to use the -G option
(see mount_msdos(8)).
Notice: There seems to be a problem with ICD-formatted disks.
Try to mount them without -G.
Waldi Ravens remarks:
Disklabel(8) doesn't know anything about the AHDI partition table. It can only handle a NetBSD partition table. It is very old software, from the times that hard disks had a fixed geometry. Modern SCSI disks do not have a fixed number of sectors per cylinder, so you'll have to do some calculations here.
Guaranteed is the total number of sectors per unit (the size of partition c, the whole disk), which is provided by the SCSI driver. You'll have to figure out which values are best used for the number of cylinders and sectors per cylinder (depending on your partitions; it's best if partitions start and end at cylinder boundaries).
BTW, when you add a partition to the label, you must increase the number of partitions manually. It will certainly be improved. But disklabel(8) is not a platform dependent tool, so it's much more difficult to get some improved code in the main source tree.
I recommend that you:
-c).
sd0 and sd1. When you add a new disk with
scsi-id 0, the old disks will become sd1 and sd2
while the new disk becomes sd0.
To fixate the links, you have to build your own kernel. Go to the config directory and edit 'std.atari'. Currently the line for configuring disks looks like:
sd* at scsibus? target ? lun ?If you change this to read:
	sd0   at scsibus0 target0  lun?
	sd1   at scsibus0 target1  lun?
	sd2   at scsibus0 target2  lun?
         |    |              |      |
         |    |              |      |
you can remove scsi-0 without having to worry about scsi-id's
sd1 and sd2
getting a different name.
/etc/timezone to the appropriate file
in /usr/share/timezone. If you live in Central Europe, for
instance, use
ln -s /usr/share/timezone/MET /etc/timezoneDaylight Savings Time will automatically be taken care of. This may break if your local politicians change the DST scheme. You will then need a new time zone file.
There is currently a problem with this approach: Files copied to a Gemdos partition from NetBSD will appear to have a modification time that is off by the difference between UTC and your local time. If you copy these files back to a NetBSD file system, this offset will double.
If you don't want your Atari system clock to run UTC, set it to your local time and symlink to UTC under NetBSD. Manually adjust the system clock for DST twice a year as you did in the past.
In kernels newer than mid-december 1996 (1.2B), there is a new device
/dev/rtc. I consider it experimental - there is no consensus in the
NetBSD developers group about this. In the meantime, it's there and you
can use it and it has some side effects that you have to be aware of.
Also, let me know what you think of it and your experiences using it.
Both the DST and TIMEZONE options are gone from the
kernel config-files.
When the kernel boots, it grabs the time from the RTC as if it were running
in UTC. When the kernel is instructed to reboot/halt, it won't update the
RTC device with the kernels idea of the time. This means that setting the
date with date(1) will not change the RTC time. If you want
to update the
RTC, you'll have to do so explicitely using:
date [-u] +%Y%m%d%H%M.%S>/dev/rtc
If your RTC runs in UTC, supply the -u flag. For a clock running
in local time, omit it. In the latter case, you have to reset the date during
startup too. Add a line
date `cat /dev/rtc`
to /etc/rc.local (or something equivalent).
See also the rtc(4) manual page.
  /pub/NetBSD/NetBSD-1.5.2/source/syssrc.tgz
    (the sources of the 1.5.2 kernel)
  /pub/NetBSD/NetBSD-current/tar_files/src/sys.tar.gz
    (the latest kernel sources)
After unpacking the sources, the kernel source is located on '/usr/src/sys'.
You should now start with configuring the kernel you wish to build. So go
to the directory: /usr/src/sys/arch/atari/conf . Among others,
you see a bunch of files in capital letters - the kernel config files:
  - BOOT     The kernel as supplied on the boot floppy
  - BOOTX    Basically BOOT with 3 virtual consoles
  - ATARITT  A more TT specific kernel
  - FALCON   A more Falcon specific kernel
  - HADES    A more Hades specific kernel
  - GENERIC  A bulky kernel with a lot of options turned on
Browse a bit through the files and copy the one you like most to, say,
MYKERNEL. add or change the file to your liking and when you are
finished, type: config MYKERNEL. When there are no errors, a new
directory is setup for you:
/usr/src/sys/arch/atari/compile/MYKERNEL. Go to this directory
and type: make depend && make. You'll have some time to drink
coffee now.
When all goes well, you will have a file called netbsd. This is
your newly built kernel. Save your working kernel to netbsd.old,
copy the new kernel to wherever you keep your kernels and try booting it.
If you went for the -current kernel and config(1) gave error
messages, fetch config.tar.gz and rebuild config.
WARNING: You should always have a backup of a working kernel at hand! Copy your current kernel to (say) /onetbsd. You can boot the old kernel by interrupting the boot loader (hold down the right shift key) and specifying the old kernel (/onetbsd).
BOOTX kernel of release 1.3 has 4 views.)
     xbase.tgz
     xfont.tgz
     xserver.tgz
     xcomp.tgz
     xcontrib.tgz
# sh -c 'for name in x*.tgz ; do tar --unlink -C / -xzvpf $name ; done'
/etc/ld.so.conf:
/usr/X11R6/lib
ldconfig.
gzip, but the old atari X servers cannot read compressed
fonts.
     # cd /usr/X11R6/lib/X11/fonts
     # sh -c 'for name in * ; do ( cd $name && gzip -d *.gz && mkfontdir ) ; done'
/usr/X11R6/bin/X
to the correct X server for your video hardware. For example:
     # cd /usr/X11R6/bin
     # rm X
     # ln -s XF86_FBDev X
/usr/X11R6/lib/X11/XF86Config.
startx to start X.
networking(4) first. Ask specific questions on the port list.
Hubert Feyrer has written a networking faq for NetBSD/amiga. It is available at www.feyrer.de/NetBSD
     # sleep 100 < /dev/rsd*c &
     # mbrlabel sd*
     # mount -t msdos -o rw,-l /dev/sd*a /mnt
Note that the file structure of the disk will not be modified by these
steps. Replace the '*' by the number your Zip-driver got during the device
probing. Study the output of 'dmesg' for the occurrence of 'ZIP' to
determine this. Include the '-l' option to maintain Windows95 operating
system's long filename support. Performing a 'disklabel' on the disk should
give you the following partition info:
     # disklabel sd*
           ...
     3 partitions:
     #        size   offset     fstype   [fsize bsize   cpg]
       a:   196576       32      MSDOS                        # (Cyl. 0*- 95)
       c:   196608        0     unused        0     0         # (Cyl. 0 - 95)
After mounting, 'df' should yield the following (if you 'rm' the demo
program from the disk first):
     # df
     Filesystem  1K-blocks     Used    Avail Capacity  Mounted on
     /dev/sd*a       98078        0    98078     0%    /mnt
If a Zip disk is formatted under Windows95 _without_ Iomega Zip Tools
installed then only the following command is required to mount it:
# mount -t msdos -o rw,-l /dev/sd*c /mnt
After mounting, 'df' (with no files or directories) should yield:
     # df
     Filesystem  1K-blocks     Used    Avail Capacity  Mounted on
     /dev/sd*c       96050        0    96050     0%    /mnt
If you 'mbrlabel' a zip disk with this latter format then you will get the
following:
     # mbrlabel sd*
     Warning: NetBSD partition 'a' includes AHDI bad sector list
At this point you will need to start over (using eject sd* is an easy way
to do this).
.t<return> and your system should boot into
TOS. You can now use the floppy with loadbsd.ttp on it.
     "top side"
    +-----------------------------------------------------------------+
    |                                                                 |
  A++  +-----+                                                        ++
  U||  |  A  |  ++                                                    ||
  I||  +-----+  || D                                                  ||
   ++           ++                                        +-+         || VME
    |                                                     | |         ||
    |                                                     | | C       ||
  B |                                                     | |         ||
  N-+                                                     +-+         ||
  C |                                                         +---+   ++
    |                                                         +---+ B |
    +-----------------------------------------------------------------+

  jumper array A (J1-J6):
    all to bottom -> BNC (thin Ethernet)
    all to top    -> AUI (thick Ethernet)

  jumper D (J7)
    to top    -> BNC (according to Udo there should be NO jumper!)
    to bottom -> AUI

  jumper array C (J17-J23):
    all closed -> TT
    all open   -> MegaSTE

  jumper array B (J8-J10)
    meaning unknown. Jumpering on Udo's and mine TT-card: closed/open/closed


  There is additional info about the jumper 'D' settings. According to
  Doug Duchene, he has a card that has only two pins installed on jumper
  'D'. It only allows the "top" setting. For his card, the description
  should read:

  jumper D (J7)
    shorted -> fused power (+12vdc) to pin 13 of the AUI connector.
    open    -> no power available at pin 13 of the AUI connector.
     +---------------+
     |           |  '|
     |           |   | (The ' gives the location of the 3 packs - note
     |===============|  that this was supposed to be a top view...)
All TT's have sockets for terminators located near the SCSI connector on the
back (see picture above). Not all TT's have the resistors inserted. These
resistors should be inserted only when no external device is present and be
removed otherwise. In the latter case, the external device at the end of the
chain should be terminated.
     text     devicename  new name   driver   chip       supported  see note#
     ========================================================================
     serial1  /dev/ser01  /dev/ttyB1          68901       No
     serial2  /dev/ser02  /dev/ttyA0  zs0     ZS8530      Yes        1
     modem1   /dev/mdm01  /dev/ttyB0  ser0    68901       Yes        2/3
     modem2   /dev/mdm02  /dev/ttyA1  zs0     ZS8530      Yes
To (temporarily I hope) add some more confusion in serial driver land, the column 'new name' was added. What gives... Since the introduction of the dialin/dialout split in (April 1998) NetBSD-current, the original choice of the atari-bound tty names turned out to be clumsy. At that time it was decided to adhere to the NetBSD-standard convention of tty[A-Z][0-9] for dialin and dty[A-Z][0-9] for dialout devices. The first formal release using this standard will be 1.4.
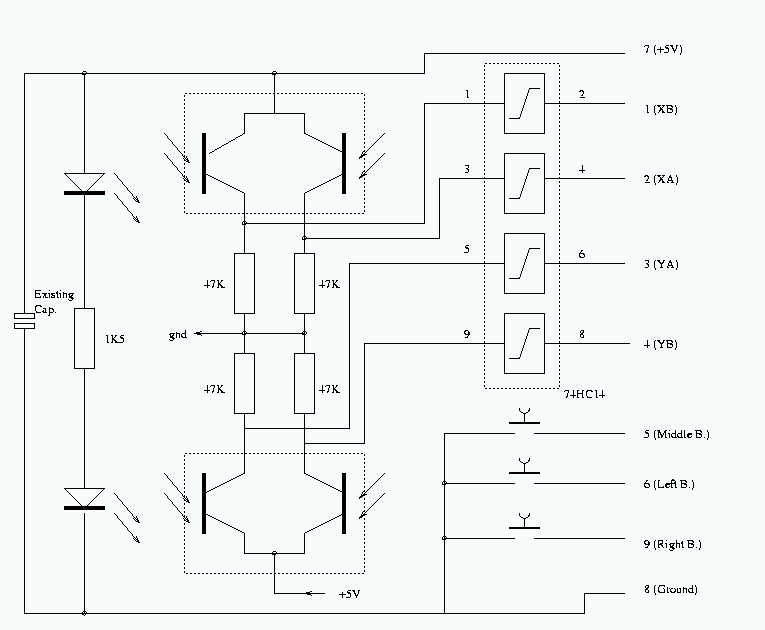
Also, follow the trace connecting the IR-LED's. There should be a resistor in this path. The extra resistor you need should have approximately the same value as the resistor you find here.
t command in the debugger produces a stack-trace).
|
|